


Implementation of music player using single chip microcomputer
 7
7Global electronic component supplier AMPHEO PTY LTD: Rich inventory for one-stop shopping. Inquire easily, and receive fast, customized solutions and quotes.
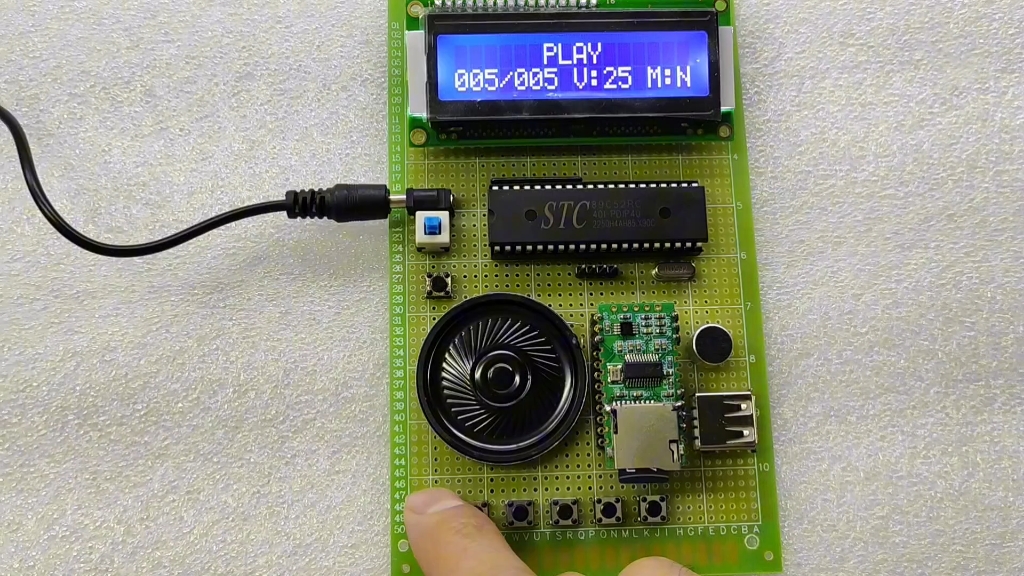
Implementing a music player using a single-chip microcontroller (MCU) is a fun and educational project. Below is a step-by-step guide to help you build a basic music player using an MCU like the ATmega328P (used in Arduino Uno) or any other microcontroller with sufficient memory and processing power.
Components Required
-
Microcontroller: ATmega328P, STM32, ESP32, or any other MCU.
-
Audio Amplifier: LM386 or PAM8403 for amplifying the audio signal.
-
Speaker: Small 8-ohm speaker.
-
SD Card Module: To store and read music files (e.g., WAV or MP3 files).
-
Push Buttons: For play, pause, next, and previous controls.
-
Resistors, Capacitors, and Wires: For circuit connections.
-
Power Supply: 5V or 3.3V, depending on the MCU.
-
Optional: OLED/LCD display for showing song information.
Steps to Implement the Music Player
1. Circuit Design
-
Connect the SD Card Module to the MCU using SPI (Serial Peripheral Interface).
-
Connect the Audio Amplifier to one of the MCU's PWM (Pulse Width Modulation) pins for audio output.
-
Connect the Speaker to the output of the audio amplifier.
-
Connect Push Buttons to GPIO pins for user input.
-
Optionally, connect an OLED/LCD Display using I2C or SPI for displaying song information.
2. Software Implementation
The software will involve reading audio files from the SD card, decoding them (if necessary), and outputting the audio signal via PWM.
Key Steps in Software:
-
Initialize Peripherals:
-
Set up SPI for SD card communication.
-
Configure PWM for audio output.
-
Set up GPIO for push buttons.
-
-
Read Audio Files:
-
Use a library like FatFs (for STM32) or SD.h (for Arduino) to read WAV or MP3 files from the SD card.
-
-
Decode Audio:
-
If using WAV files, they can be played directly as they are typically uncompressed.
-
If using MP3 files, you’ll need a decoder library like Helix MP3 Decoder or VS1053 (if using an external decoder chip).
-
-
Output Audio via PWM:
-
Use the MCU’s PWM module to generate an analog-like signal for the audio amplifier.
-
Adjust the PWM duty cycle based on the audio data.
-
-
User Interface:
-
Implement button controls for play, pause, next, and previous.
-
Optionally, display song information on an OLED/LCD.
-
3. Example Code (Arduino-Compatible)
Below is a simplified example for playing a WAV file from an SD card using an Arduino-compatible MCU:
#include <SD.h>
#include <TMRpcm.h>  // Library for playing WAV files

#define SD_CS_PIN 10
#define SPEAKER_PIN 9

TMRpcm audio;

void setup() {
  // Initialize Serial for debugging
  Serial.begin(9600);

  // Initialize SD card
  if (!SD.begin(SD_CS_PIN)) {
    Serial.println("SD card initialization failed!");
    return;
  }
  Serial.println("SD card initialized.");

  // Set up audio output
  audio.speakerPin = SPEAKER_PIN;
  audio.setVolume(5);  // Set volume (0 to 7)

  // Play a WAV file
  audio.play("music.wav");
}

void loop() {
  // Add button controls here
  // Example: if (digitalRead(BUTTON_PIN) == LOW) { audio.pause(); }
}
4. Enhancements
-
MP3 Playback: Use an external decoder chip like the VS1053 or implement a software decoder.
-
Display: Add an OLED/LCD to show song title, duration, and playback status.
-
Playlist: Implement a playlist system to play multiple songs in sequence.
-
Volume Control: Add a potentiometer or digital volume control.
5. Challenges
-
Memory Limitations: MCUs have limited RAM, so playing high-quality audio may require external hardware.
-
File Format: WAV files are easier to play but take up more space. MP3 files require decoding.
-
Real-Time Processing: Ensure the MCU can handle reading, decoding, and outputting audio in real time.
Conclusion
By following the above steps, you can build a basic music player using a single-chip microcontroller. This project is a great way to learn about embedded systems, audio processing, and interfacing with peripherals. As you gain experience, you can expand the functionality and improve the audio quality.