


Raspberry Pi 5 NAS vs Synology NAS for Photo Storage and Backup
January 12 2024  2782
2782
2782Inquiry
Global electronic component supplier AMPHEO PTY LTD: Rich inventory for one-stop shopping. Inquire easily, and receive fast, customized solutions and quotes.
QUICK RFQ
ADD TO RFQ LIST
In this blog, we aim to provide an in-depth comparison of Raspberry Pi 5 NAS and Synology NAS, delving into the key aspects of each system, including reliability, setup process, and connectivity.
What is a Raspberry Pi 5 NAS?
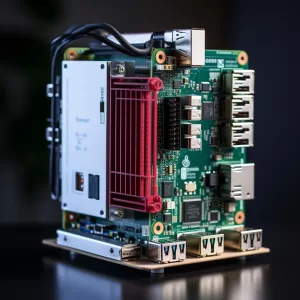
Is Raspberry Pi Good for NAS?
The Raspberry Pi has become well-known as an adaptable and affordable platform for a range of do-it-yourself (DIY) projects, such as network-attached storage (NAS). For those looking for a NAS system that they can customize, its small size and low power consumption make it a desirable choice. It's crucial to assess its dependability and performance in photo backup and storage, nevertheless.How to Create a NAS with Raspberry Pi 5?
-
- Choose your hardware: Select the Raspberry Pi 5, case, power supply, storage disks (SSDs or HDDs), and other components.
- Install an operating system: Raspberry Pi OS is a popular choice.
- Install NAS software: Install a network storage application (NAS) such as Rockstor, FreeNAS, or OpenMediaVault.
- Configure your NAS: Create shares, storage pools, and user access.
- Make sure you always have a backup plan in place for your data.
Video related to How to Build a Raspberry Pi NAS
What is a Synology NAS?
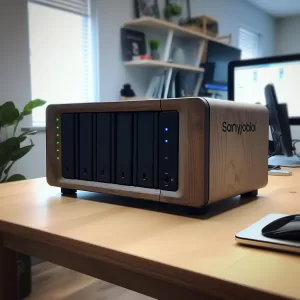
How to Setup Synology NAS?
- Unpacking: Take out the NAS device, power supply, Ethernet cable, and any hard drives you want to install from the box, and make sure you have everything you need.
- Installation of Hard Drives: You will need to install hard drives if your Synology NAS does not have them pre-installed. To correctly install the hard drives, refer to the instructions that came with your NAS.
- Connection: Use the included Ethernet cable to link your Synology NAS to your network. Turn on the NAS by plugging in the power adapter.
- Accessing the NAS: Synology's "DiskStation Manager" (DSM) operating system allows you to configure and administer your NAS after it has been turned on. By typing your NAS's IP address into the address bar of a web browser, you can access DSM.
- Initial Setup: To finish your Synology NAS's initial setup, adhere to the on-screen directions. This could involve creating storage volumes, adjusting network settings, and setting up administrator credentials.
- Data Protection: To secure your data from drive failures, set up data protection technologies like RAID (Redundant Array of Independent Disks).
- Additional Configuration: You might want to set up other features like shared folders, user accounts, backup jobs, and media server functionality based on your requirements.
- Security: Configure firewall settings, turn on automatic software upgrades, and create strong passwords to make sure your Synology NAS is secure.
- Accessing Your NAS Remotely: You can use Synology's QuickConnect or configure port forwarding on your router to enable remote access to your NAS from locations outside of your local network.
Raspberry Pi 5 NAS vs Synology NAS
Both Raspberry Pi 5 NAS and Synology NAS are fantastic options for storing and backing up your data, particularly photos, but they cater to different needs and preferences. Raspberry Pi 5 NAS: Pros:- DIY flexibility: You select and put together the hardware, customizing it to fit your demands and price range.
- Performance potential: For seamless photo backup and storage, the most recent Raspberry Pi 5 has remarkable computing capability.
- Lower upfront cost: If you already have some components, this option may be less expensive than Synology NAS systems that are already assembled.
- Tech-savvy satisfaction: Creating your own NAS can be a satisfying hands-on activity that leaves you feeling accomplished.
- Steeper learning curve: Requires technical expertise for setup, configuration, and maintenance.
- Software complexity: Compatibility problems and errors might arise with open-source NAS software.
- Long-term reliability: In contrast to well-known companies like Synology, there may be issues with hardware and software stability.
- Time commitment: For novices in particular, setup and troubleshooting can take a lot of time.
- Easy to use: Web-based administration and a simple, plug-and-play setup with an intuitive UI.
- Extensive features: Automatic backups, media streaming, file sharing, and security settings are all included in the default functionality.
- Reliability and stability: Reputable brand with a history of strong hardware and frequent software updates.
- Seamless integration: Compatible with a wide range of hardware and operating systems.
- Warranty and support: A manufacturer's warranty and easily accessible support resources provide you peace of mind.
- Higher upfront cost: Compared to do-it-yourself Raspberry Pi NAS solutions, pre-built systems are typically more expensive.
- Limited customization: Compared to making your own, you have less freedom to select the hardware and software.
- Performance limitations: A premium Raspberry Pi 5 system outperforms some Synology NAS products in terms of performance.
- Dependence on the manufacturer: Synology is more heavily relied upon for bug patches and software updates.
How to Find Synology NAS on Network?
- Synology Assistant: Synology offers a desktop application named "Synology Assistant" to assist you in finding and controlling your Synology network-attached storage devices. This program is available for download and installation on your computer via the Synology website. After installation, launch the Synology Assistant to find any Synology NAS devices on your local network and view their IP addresses and other pertinent data.
- Router Admin Interface: Another way to locate your Synology NAS is to log into the administration panel of your router. The majority of routers provide a section where all connected devices are shown together with their IP addresses. Look for your Synology NAS in the list of linked devices to determine its IP address.
- Network Scanning Tools: You can use network scanning software such as Advanced IP Scanner or Angry IP Scanner to scan your local network for connected devices, including your Synology NAS. You can identify your NAS by using these tools, which will give you a list of IP addresses and related device names.
- Router's DHCP Client List: A lot of routers offer a list of the devices that have gotten an IP address from the router's DHCP server. To find the IP address assigned to your Synology NAS, you can look through this list.
Conclusion
In conclusion, the choice between a Synology NAS and a Raspberry Pi 5 NAS for photo storage and backup relies on several aspects, such as long-term dependability, setup simplicity, and performance. You may choose a storage solution that best suits your needs and tastes by considering the information included in this extensive comparison.Populer Posts
LCMXO3LF-4300E-5MG121I
Lattice Semiconductor Corporation
EP3C5E144C7
Intel
EP4SGX290FF35C2XN
Intel
EP4S40G5H40I1N
Intel
EP4SGX530KH40C3G
Intel
5SGXMA5H2F35I2G
Intel
10AX090N2F45E2SG
Intel
5SGXEA7K3F35I3LG
Intel
XC3030L-8VQ64C
AMD
EP1C3T144A8N
Intel
1SG280HU3F50I2LG
Intel
M1A3PE3000L-FGG484M
Microchip Technology