Installing the Nest Power Connector: A Foolproof Guide
November 09 2023  1643
1643
Inquiry
Global electronic component supplier AMPHEO PTY LTD: Rich inventory for one-stop shopping. Inquire easily, and receive fast, customized solutions and quotes.
QUICK RFQ
ADD TO RFQ LIST
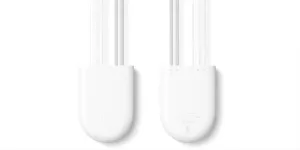
The Nest Power Connector is a simple and affordable device that can help you get the most out of your Nest thermostat. Even in cases when Nest thermostats are incompatible with the wiring in your house, it gives your thermostat a steady power source. In this blog, we will walk you through the process of installing the Nest Power Connector, ensuring a smooth and successful installation.
What is a Nest Power Connector?
The Nest Power Connector is a device designed to provide a reliable power source for your Google Nest thermostat. It guarantees a constant power source, doing away with the requirement for batteries and any possible downtime. With its smooth integration with Nest thermostats, this connector is specifically designed to provide improved energy efficiency and performance.
Benefits of the Nest Power Connector
- Eliminate Battery Hassle: Bid adieu to the inconvenience of having to change batteries all the time. With the continuous power supply provided by the Nest Power Connector, your thermostat will operate flawlessly and without interruption.
- Enhanced Energy Efficiency: By removing the power drain that battery-operated thermostats create, the Nest Power Connector maximizes energy efficiency. There is a chance that your energy bills will go down as a result.
- Stable Power Supply: Your thermostat may not function properly due to power fluctuations. By offering a steady power source, the Nest Power Connector eliminates any performance problems brought on by power spikes or drops.
Preparing for Installation
Before embarking on the installation process, it's crucial to gather the necessary tools and materials to ensure a smooth and efficient workflow. These typically include:- Screwdriver: When securing different connections, a reliable screwdriver will be your best friend.
- Wire strippers: To ensure correct connections, remove the insulation from the wires with the aid of these useful instruments.
- Electrical tape: Electrical tape ensures secure connections by protecting and insulating exposed wires.
- Voltage tester: Before handling electrical connections, make sure the power is off by using a voltage tester.
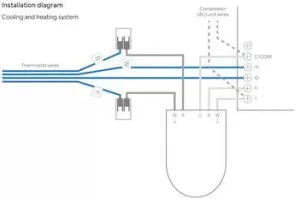
- Nest Power Connector wiring diagram: Learn how to read the wiring schematic for the Nest Power Connector so that you can identify the connections needed for a successful installation.
Nest Power Connector wiring diagram

How to install a Nest Power Connector?
With your tools and materials assembled, let's dive into the installation process: Step 1: Power Off the HVAC System First and foremost, safety! It's important to cut off the electricity to your HVAC system at the circuit breaker or fuse box before starting any electrical work. By doing this, all possible risks during the installation procedure will be avoided. Step 2: Locate the HVAC System's Control Board Usually located next to the air handler or furnace is the control board. All of the electrical connections are established at this central hub. Step 3: Identify the Thermostat Wires Usually, the thermostat wires are gathered together and attached to a control board screw terminal or terminal block. Find the cables with the labels "Y," "W," "R," "G," and maybe "C." Step 4: Connect the Nest Power Connector- Attach the C-wire Adapter: The "C" connector on the control board is connected to the C-wire adapter that is included with the Nest Power Connector. All you have to do is press the adapter onto the terminal until it clicks firmly into place.
- Connect the External Transformer: The power supply for the Nest Power Connector is provided by an external transformer that is also included. Attach the two wires from the transformer to the matching terminals on the Nest Power Connector, usually marked "R" and "C."
- Connect the Thermostat Wires: Attach the thermostat's "R" wire to the Nest Power Connector's "R" terminal. On the Nest Power Connector, similarly attach the thermostat's "Y" wire to the "Y" terminal.
- Attach the thermostat's "C" wire to the control board's "C" terminal.
- Attach the thermostat's "G" wire to the control board's "G" terminal.
- If the "W" wire on your thermostat is present, attach it to the control board's "W" terminal.
- Check the Nest Thermostat: Navigate to Settings > Equipment > Power Connector in the Nest app to check the thermostat. The status should be "Detected."
- Test the HVAC System: To make sure the HVAC system performs as planned, adjust the thermostat settings.
Video related to How to Install a Nest Power Connector
How Does the Nest Power Connector Work?
- Identifying the Power Source: The Y1 or W1 cable, which supplies power from the HVAC system to the thermostat, is normally where the Nest Power Connector is attached. These cables have a voltage of 24 volts AC and are usually thicker than conventional thermostat wires.
- Power Tapping: The Nest Power Connector draws a tiny amount of electricity from the Y1 or W1 cable via a method known as "power tapping." The thermostat's current power source is not interrupted in any way during this tapping process.
- Voltage Regulation: The voltage regulator in the Nest Power Connector makes sure the Nest thermostat always receives 24 volts of AC power. This is significant since a steady power supply is necessary for the Nest thermostat to operate correctly.
- Safety Mechanisms: To guard against electrical risks, the Nest Power Connector is equipped with several safety features. Fuse protection, overcurrent protection, and heat protection are a few of them.
- Communication with the Thermostat: To make sure the Nest thermostat is getting the right amount of power, the Nest Power Connector talks with it. A low-voltage communication line is used for this exchange of information.
Troubleshooting: Nest Power Connector Not Detected
In rare cases, you may encounter issues where the Nest Power Connector is not detected by your thermostat. This section provides troubleshooting tips to help you identify and resolve such problems effectively:- Verify Power Connections: Make sure the HVAC system and the Nest thermostat are both correctly connected to the Nest Power Connector. Make sure all of the wiring connections are safe and undamaged by giving them a second look.
- Check Transformer Output: Make sure the transformer is delivering the right voltage output by using a voltage tester. The transformer might need to be changed if the output is off.
- Restart the Nest Thermostat: Try restarting the Nest thermostat by pressing and holding the center button for ten to fifteen seconds, or until the thermostat reboots. Occasionally, this can fix small software bugs.
- Update Nest Thermostat Software: Make sure that the most recent software version is installed on the Nest thermostat. Use the Nest app to see if there are any updates available, then install them if needed.
- Consult Nest Power Connector Manual: Examine your Nest Power Connector handbook for more detailed troubleshooting instructions unique to your specific model.
Conclusion
Your Google Nest thermostat will function better and be more dependable after installing the Nest Power Connector, which is an easy operation. You can have peace of mind, better energy efficiency, and continuous operation according to this infallible guidance. Experience a more intelligent and effective home heating and cooling system by making use of the advantages provided by the Nest Power Connector.FAQs about Nest Power Connector
What is a Nest Power Connector? The Nest Thermostat is connected to your HVAC system via a device called a Nest Power Connector. It replaces your thermostat's battery requirement with a withsteady and dependable power source. Your Nest Thermostat will always be powered and operational thanks to the Power Connector, which is made to work with HVAC systems that are compatible with it. How to Install the Google Nest Power Connector? This thorough manual offers a thorough, step-by-step installation procedure for the Nest Power Connector. Before continuing, make sure you have the required equipment and supplies and closely follow the instructions. Is the Nest Power Connector Free? When you buy a Google Nest thermostat, you do not get the Nest Power Connector. It is available for purchase online or at other stores, and it is sold individually.Populer Posts
EP4SGX70HF35C2G
Intel
EP4CGX110DF27C7
Intel
LIFCL-40-8BG256C
Lattice Semiconductor Corporation
5SGXMA7N2F45I3G
Intel
1SG065HH1F35I2VG
Intel
A3P125-1TQG144
Microchip Technology
5CEBA7F31C8N
Intel
10M25DCF256A7G
Intel
1SG040HH3F35E3XG
Intel
10AX027H4F35E3LG
Intel
EP2AGX45DF25I5G
Intel
